


Posted On:
Category:
Common Sprinkler System Repairs and Solutions
Common Sprinkler System Repairs and Solutions
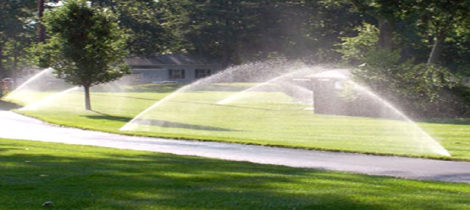
Hydration is a key element of maintaining a plush, healthy lawn. While natural rain water does provide substantial hydration, you still need a quality sprinkler system for optimum results.
But what happens when your irrigation system stops working? Are there warning signs to look for? And how can you fix the problem?
Here we’ll discuss some of the most commom sprinkler system repairs issues and solutions.
Grab your garden hose and let’s get started!
Warning Signs
The first step in identifying you’re in need of sprinkler system repair is recognizing the warning signs. Here are a few ways your lawn is telling you it’s thirsty and your sprinkler system is on the fritz.
High Water Bill
Show me the money! If you’re shocked the next time you open your water bill it may be a sign that your sprinkler system isn’t working efficiently.
Most often this spike in price will come suddenly and is caused by a leak in your system. This means the water is escaping the pipes as it works to hydrate your lawn.
A well maintained and calibrated irrigation system will use up to 50% less water than an old, outdated system. We will discuss why next.
Faulty Control Valves
In addition to a leak, your system’s control valves might be broken. These valves are responsible for delivering the right amount of water to each area of your lawn.
If you notice certain patches of grass that are dry or brown, while others appear overwatered, these could be signs of a dripping or faulty valve.
Check the valve itself. Is it wet? Is the area below the valve damp?
Pooling watering or a visible drip near filters or pressure regulators isn’t normal and needs addressing.
Other things to check include bubbles, dirt, grass clippings, or mold on or near your equipment.
Uneven Watering
Another sign of a leak, faulty valve, or other irrigation issue is the uneven watering of your yard. If you see large pools of water on your grass, sidewalk, or driveway, chances are you’re in need of sprinkler system repair.
The same goes for large areas of brown or dried grass. A sprinkler system is designed to water your yard evenly.
The grass should be green and healthy throughout. Signs of uneven watering mean there’s an issue with the valve, a leak, or the pressure.
Lack of Pressure
Similar to a showerhead, if your sprinkler system doesn’t have the right level of pressure, water can’t reach and adequately hydrate your lawn.
A loss of pressure in a certain zone or on a single sprinkler head could be a sign of a malfunction in your sprinkler system. Both too much and too little pressure can pose a problem.
Not enough pressure means your yard isn’t getting the right amount of water, whereas too much pressure can cause flooding and pooling. Another side effect of too much pressure is an overworked and worn out system.
Pressure issues can stem from either the control valves or the irrigation pipes themselves. If the valves appear fine, you may have a deeper issue on your hands. Irrigation pipes are underground and at risk of shifting, bending, and breaking.
Coughing Sprinkler Heads
No, your sprinkler system doesn’t have a cold but it might have an underlying problem. All sprinklers make noise as the heads release water and rotate. But if your heads are making unusual sounds or appear to be spraying off-target, it could be a sign of something more serious.
Sputtering or coughing heads could be the result of a bad valve, pressure issues, or a crack in the head. The sprinkler head may also be clogged with debris.
If your system has pop-up heads, check that they haven’t shifted out of position. If they have, this is an easy fix – simply readjust them back into place.
Solutions
Now that you know the warning signs that your sprinkler system is in need of repair, let’s take a look at some common solutions and troubleshooting techniques.
How to Fix a Leak
Sprinkler system links usually originate from underground irrigation pipes. We will dig into your yard where you suspect the issue is, exposing that section of the pipe.
Next, they’ll replace it with a new piece. Depending on how bad the leak is, entire sections of the pipe may require repair. The technician will also check if any of the sprinkler heads are leaking.
Make sure the heads aren’t spraying or dripping when the system is off. If they are, you may need to replace one or more heads.
Replacing Broken Sprinkler Heads
Sprinkler heads are susceptible to cracking and breakage over time. The good news is, this sprinkler system repair is relatively easy to perform.
First, check the sprinkler head for visible signs of cracking or breakage. These are usually pretty obvious and found on the plastic casing.
Some heads are completely broken off. If your heads are mounted too high, they’re at risk of being run over by vehicles or lawnmowers.
Once you determine that the head is broken, you need to replace it. Gently dig around the head with the system off. Save any pieces of sod you remove so that you can replace them when the job is done.
Remove the sprinkler head from the riser. Most heads are tightened by hand but may require tools to remove depending on age. Next, attach the new head and securely tighten.
Before replacing the dirt around the riser, be sure to test the new sprinkler head and return your system to the desired setting.
Cleaning Clogged Sprinkler Heads
During this process you may discover that the head isn’t broken but, instead, clogged. This is another quick fix.
Clogged heads are common and can cause problems including heads that rise but don’t spray water, heads that rise but don’t lower, or heads that spray erratically.
After digging out the problem head, remove it from the riser. Next, take the head apart by lifting it out of the canister. Here, you’ll see a screen (or filter) inside the head. This is designed to filter out any grass, debris, or dirt.
Remove the screen and rinse it with clean water. You can also rinse the entire head with clean water, removing any stuck-on debris or dirt. Once the screen and head are sufficiently clean, put the parts back together and return it to the riser.
Checking the Water Pressure
Without adequate water pressure, your lawn can’t receive the hydration it needs. Using a pressure gauge and a few other techniques, you can easily check your system’s pressure.
It’s important to check the pressure when your system is both on and off. The first test you’ll perform is known as static pressure – this is the pressure in your system when at rest.
Perform this test when the pressure is at its lowest – normally in the morning or when your system is normally scheduled to run. Use a pressure gauge to test both the upstream and downstream pressure of the system.
Be sure to check the pressure of all your system’s components. These include the spray heads, rotary heads, and drip emitters. It’s normal for your system to lose pressure when it’s running. Be sure to check the average pressure loss for your specific system.
For example, residential irrigation systems generally lose 15-25 psi, which is normal. It’s also important to test the water pressure directly at the source, or the head itself.
This test is performed while the sprinkler is running. Simply attach the pressure gauge to the valve that’s the farthest from the point of connection. If a specific zone is giving you trouble, this is the head you want to test.
Just remember, this test is done when the system is running so you will get wet!
Single Zone Issues
Sometimes the sprinkler system repair you need is only affecting one zone. These issues are sometimes electrical including low voltage or a broken fuse or transformer.
Start by testing the nonworking zone using a multimeter. Carefully touch the leads to the zone terminal and the common terminal. Check if the voltage is too low. If so, it may time to replace the controller.
You can also use the multimeter to test the transformer itself. Perform this check by attaching the leads to the transformer terminals marked 24 vac while it’s plugged in. If the display shows less than 22 vac, you may need a new transformer.
Some zone issues are also caused by defective sprinkler valves. You’ll need to check the ohms between the nonworking zone and the common terminal.
Troubleshooting zone issues isn’t always easy. If you’re not comfortable working with electrical wires, contact us for assistance at 631-647-6370
Addressing Common Sprinkler System Repairs
Is your current irrigation system acting up? Whether it’s an issue with pressure, a broken pipe, or a clogged valve, you will need to perform sprinkler system repair to get things back on track.
Please contact us at 631-647-6370